vSphere 7 and HyTrust KeyControl
April 2nd ended up being an exciting day! vSphere 7, vSAN 7.0, Site Recovery Manager 8.3, vSphere Replication 8.3, etc. I knew this weekend was going to have some fun times ahead in the home lab.
One of the things I’ve been wanting to get my hands on was the HyTrust KeyControl. I figured why not setup KeyControl while I upgrading my home lab to vSphere 7. HyTrust even announced they already support vSphere 7 via tweet on twitter.
I figured I would share my experience and go through the following:
- Setting up KeyControl
- Enabling KMIP
- Configuring Key Provider in vCenter
- Enabling vSAN encryption
- Encrypting and Decrypting Virtual Machine
- Enabling Virtualazation Based Security
One of the new features introduced in vSphere 7 is the vSphere Trust Authority. I plan on writing a separate blog about this feature in the future.
Lets start!
How to Download HyTrust KeyControl
-
Select “KeyControl”
-
Select your deployment type: ISO, OVA, Etc (I will be using OVA deployment for this Demo) Note: You will need to create an account first before downloading
Note: Downloading HyTrust comes with a 60-day free trial.
How to Install HyTrust KeyControl
Disclaimer: In this demo I plan on only deploying one KeyControl virtual appliance. In production, you would deploy multiple KeyControl VAs to form a cluster.
Please see the HyTrust Administration and Upgrade Guide for more info.
- For this Demo, I will be deploying KeyControl via OVA
Extract the zip previously downloaded. This zip provides the OVA and hashes.
!
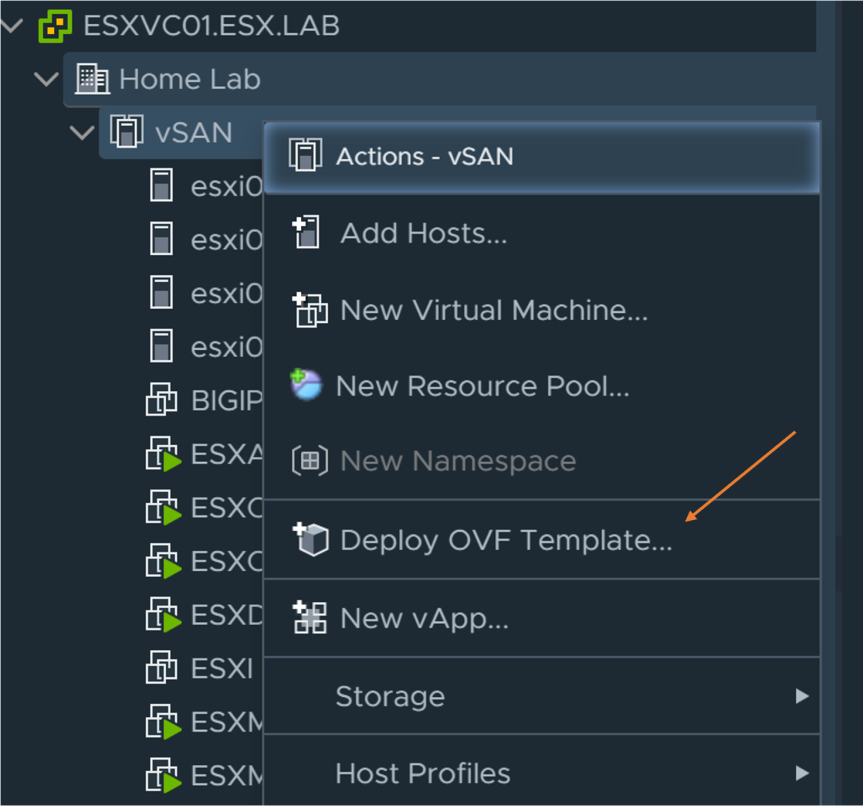
- Log into vCenter and right click on the compute resource and select “Deploy OVF template”
!
- Select “Local File” and click “Upload Files”. Traverse to folder where the OVA was extracted and click “Open”. After you have selected the OVA, press “Next”

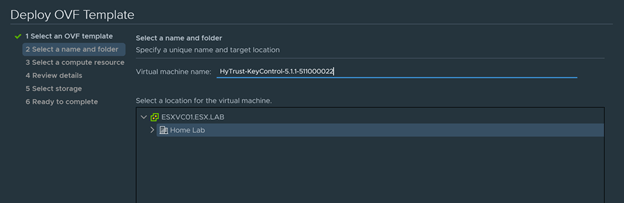
- Next provide a virtual machine name and a folder location for the virtual machine.
In this Demo I will be calling my virtual machine “ESXHYKC01”
!
- Select a compute resource
!
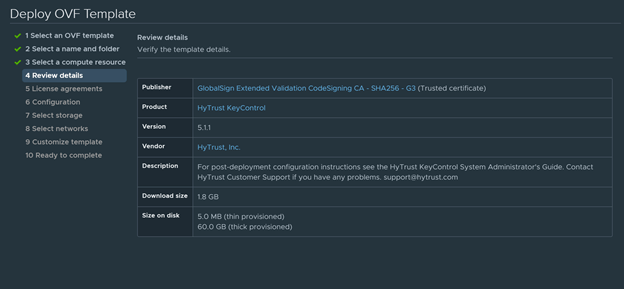
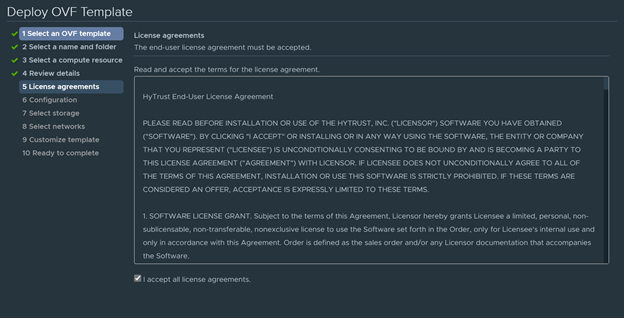
- Review Details and accept the EULA
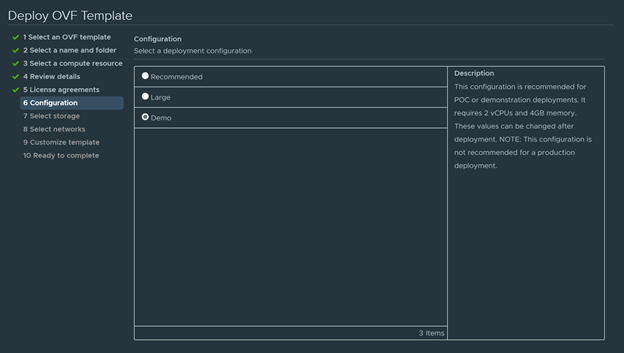
- On the configuration page, select a deployment configuration for your environment. For my home lab deployment, I will be selecting “Demo”.
Please see HyTrust DataControl Installation and UpgradeGuide for more guidance on a production environment.
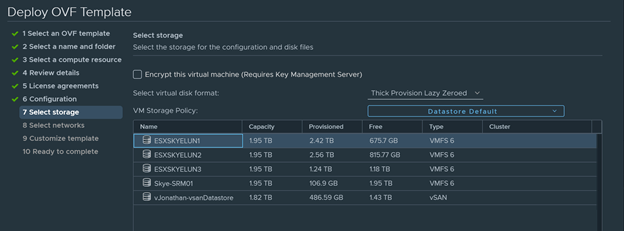
- Select a datastore where the OVA will be deploying to.
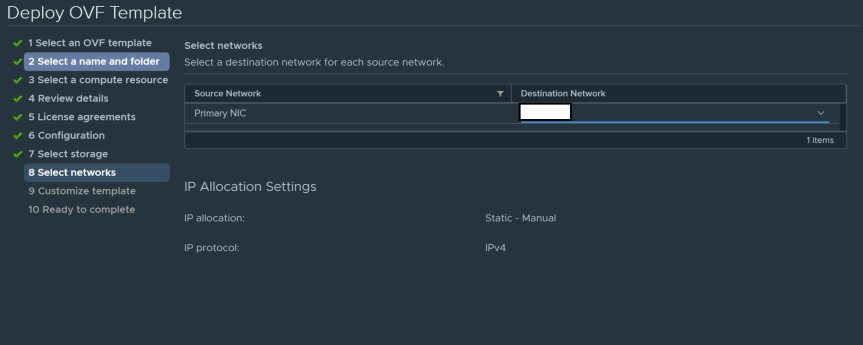
- Select the port group you will be using for this deployment.
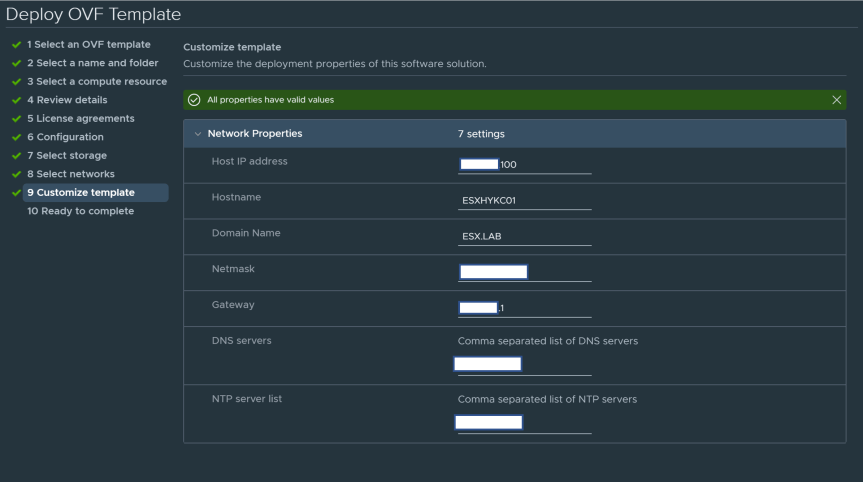
- Customize template
- Host IP Address = X.X.X.X
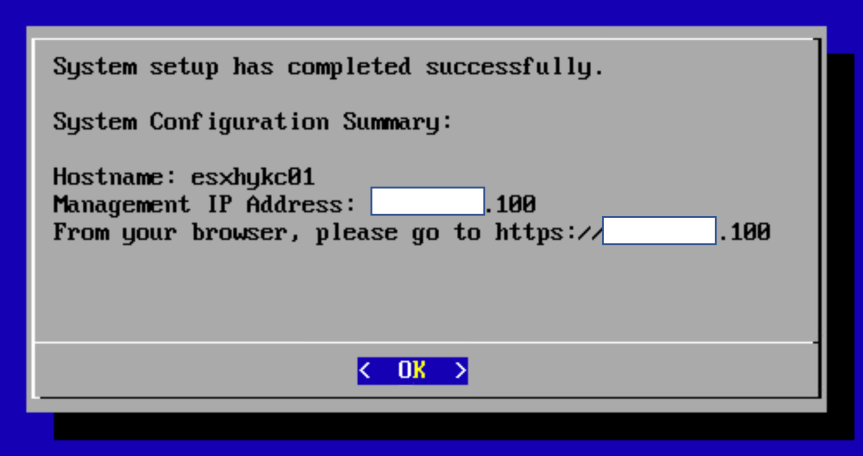
- Hostname = ESXHYKC01
- Domain Name = ESX.LAB
- Netmask = X.X.X.X
- Gateway = X.X.X.X
- DNS Servers = X.X.X.X,X.X.X.X
- NTP Servers = X.X.X.X,X.X.X.X or ntp1.esx.lab,ntp2.esx.lab
After you have completed the customize template requirements, finish the OVF template. In vCenter, you should see in “Recent Tasks” the OVA being deployed.

Initial Configuration
-
After powering KeyControl VM, open a remote console.
-
Configure a Password for “htadmin”

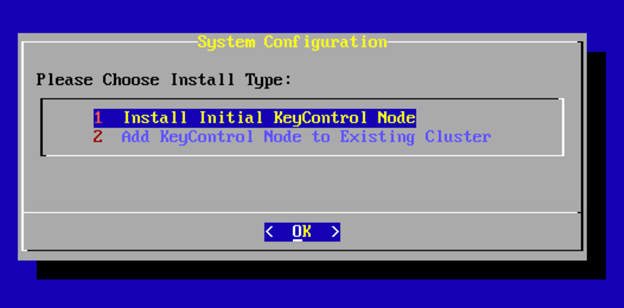
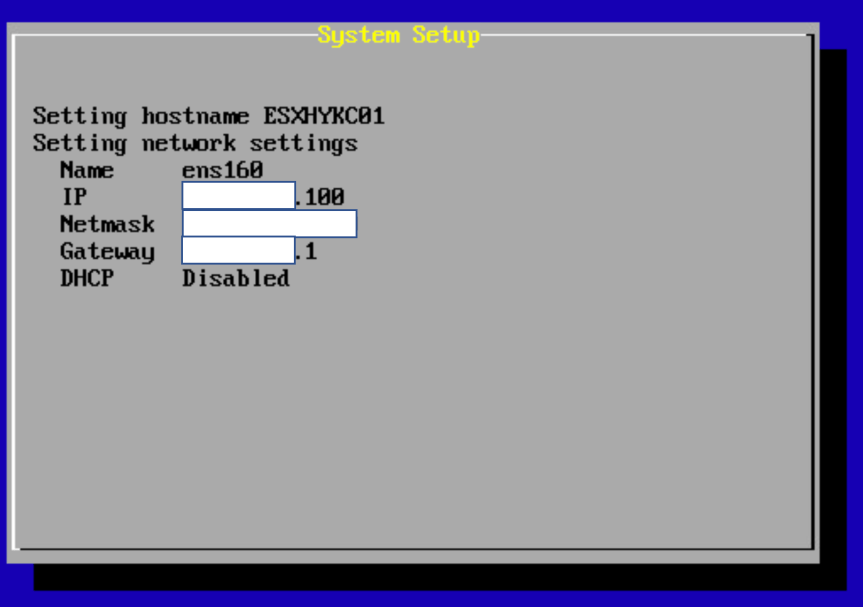
- This will be our first KeyControl Node. We will select “Install Initial KeyControl Node”. System Setup will appear and start configuring the network settings, DNS, NTP, etc.
Note: This may take a couple of minutes
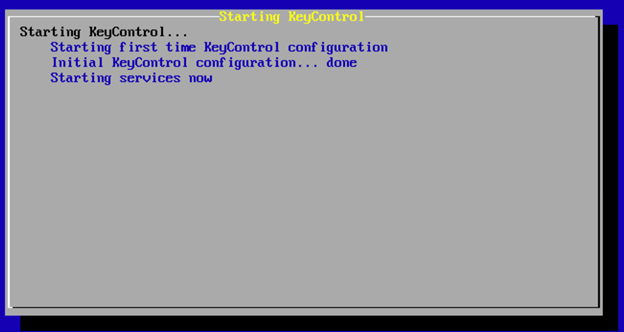
- After system setup has completed successfully, you will be presented with the configuration summary.
- Open up a web browser and type in https://Your KeyControl IP. After Certificate warning, the KeyControl login page will appear.
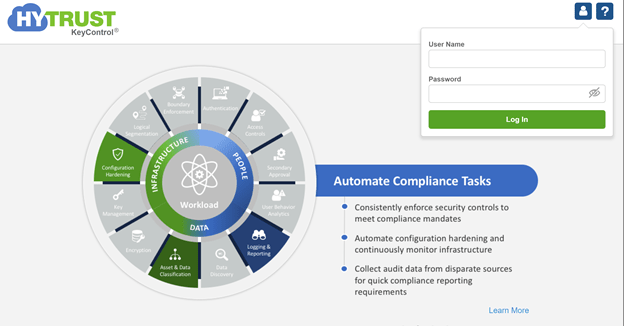
- Login with default KeyControl credentials
- Username = secroot
- Password = secroot
-
After using the “secroot” default password, KeyControl will force you to change the password and configure SMTP.
-
We should now be presented with KeyControl WebGUI.
The Admin Key
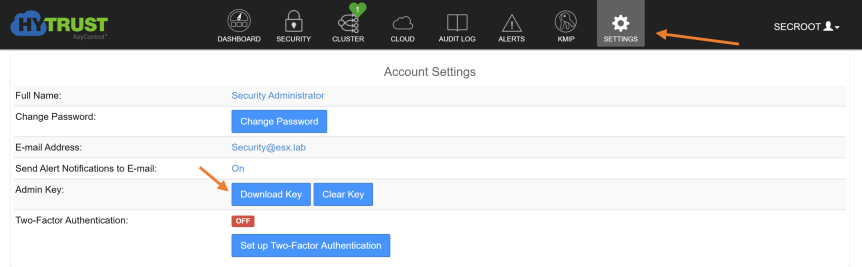
You may have noticed by now two alerts have been triggered in the KeyControl WebGUI after login with the “secroot” for the first time. KeyControl is warning you that Admin Key has been generated for “secroot”. It is recommend you backup the Admin Key. This key is required if you ever need to restore KeyControl from a backup.
Note: As you add more security admins, KeyControls shifts to an “n of m” model, here “m” is the number of security admin accounts and “n” is a user-defined value that states how many keys must be uploaded during restore before a KeyControl will be consider valid.
For example, say you had three security administrators in environment (m). You would set your user defined value (n) to require two security administrators of three admin keys to be uploaded before KeyControl could be considered valid.
More about the Admin Key can be found here.
Go to “Settings’ and click “Download Key”
Key Example, secroot_IPADDRESS.key.gen1
Configuring Authentication
I will be configuring LDAP authentication so I can add another security admin to the KeyControl.
Authentication Methods Available
- Local
- RAIDUS
- LDAP
-
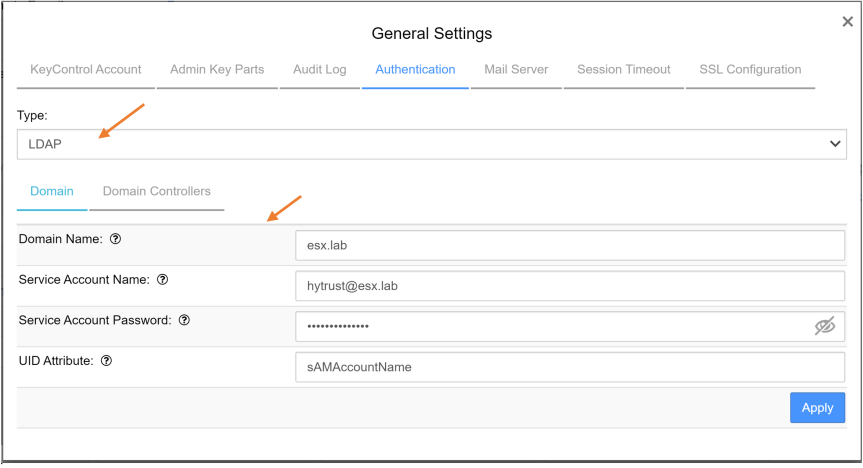
Go to “Settings” –> General Settings –> Authentication
-
Under “Type” select “LDAP” and configure the “Domain” section.
- Domain Name = ESX.LAB
- Service Account Name = ServiceAccount@ESX.LAB
- Service Account Password = Password
- UID Attribute = sAMAccountName
Note: My service account is only part of the “Domain Users” security group. This service account can be used to query Active Directory.
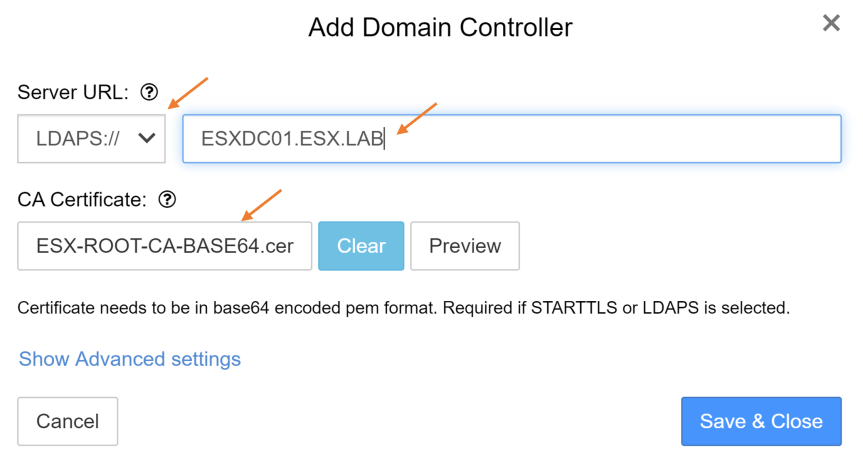
- After configuring the “Domain” section, select the “Domain Controllers” tab and click on “+” icon to add a domain controller.
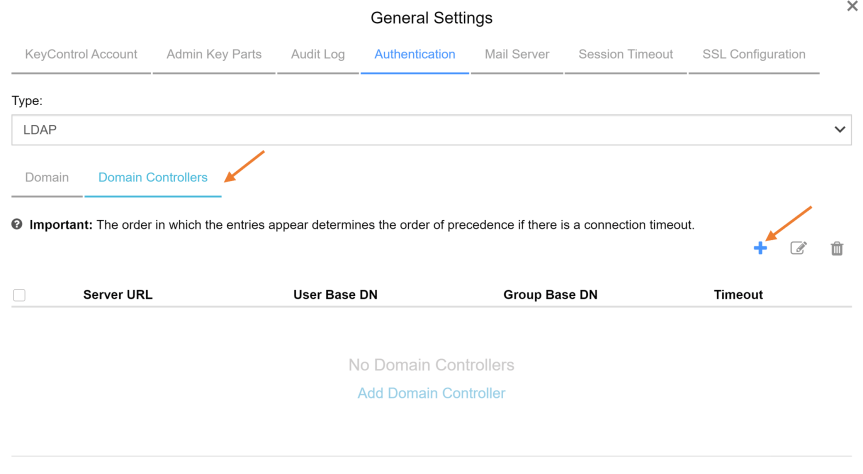
- I chose to configure LDAPS for this section. I downloaded the root certificate from my Certificate Authority.
- Choose Server URL Protocol
- LDAP
- LDAPS
- Add Server URL Domain Controller = ESXDC01.ESX.LAB or IP address
- Upload Base64 Root Certificate if you choose LDAPS
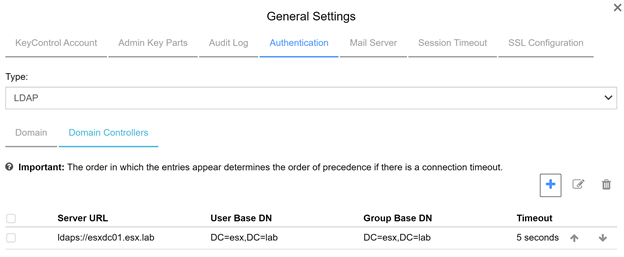
Press “Save & Close” when completed.
Adding Security Administrator
I will be adding a security administrator via LDAP Authentication. HyTrust has three different privileges
- Cloud Admin
- Domain Admin
- Security Administrator
Click here for more information about KeyControl User Accounts.
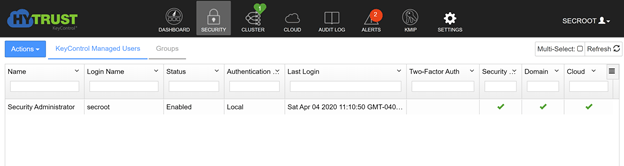
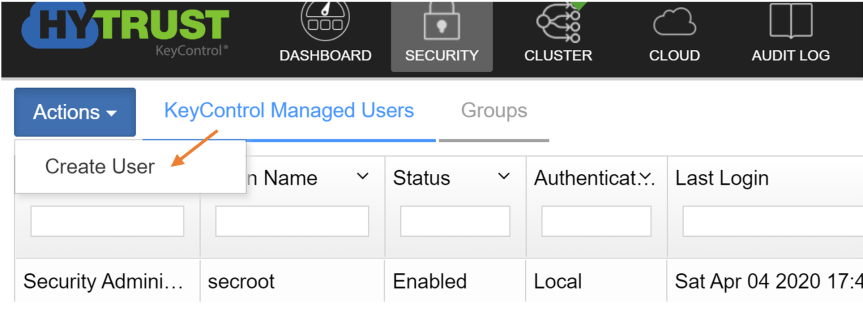
- Go to “Security” —> KeyControl Managed Users –> Under Actions select “Create User”
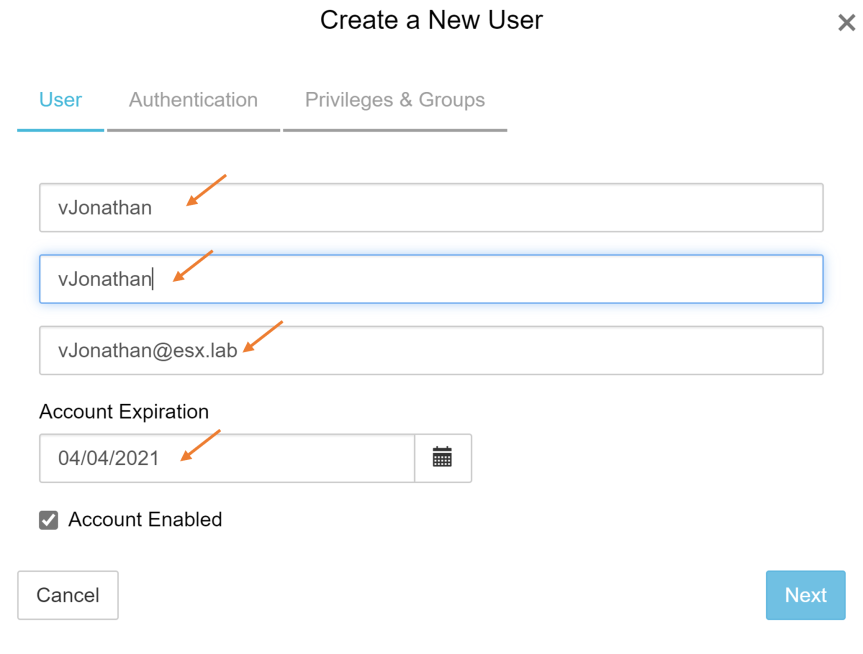
- The “Create a New User” wizard will appear.
- Login Name = sAMAccountName
- Full Name = The name of the security administrator
- Email = Email Address of the security administrator
- Set the account the account expiration date
Press “Next”
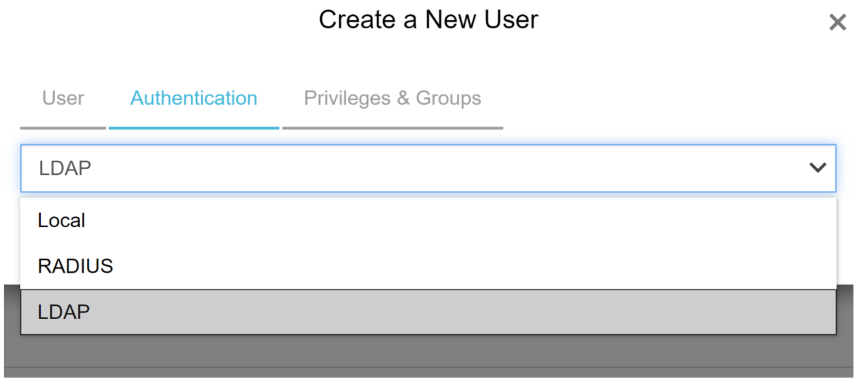
- Select the “Authentication” method for the new security administrator.
Press “Next”
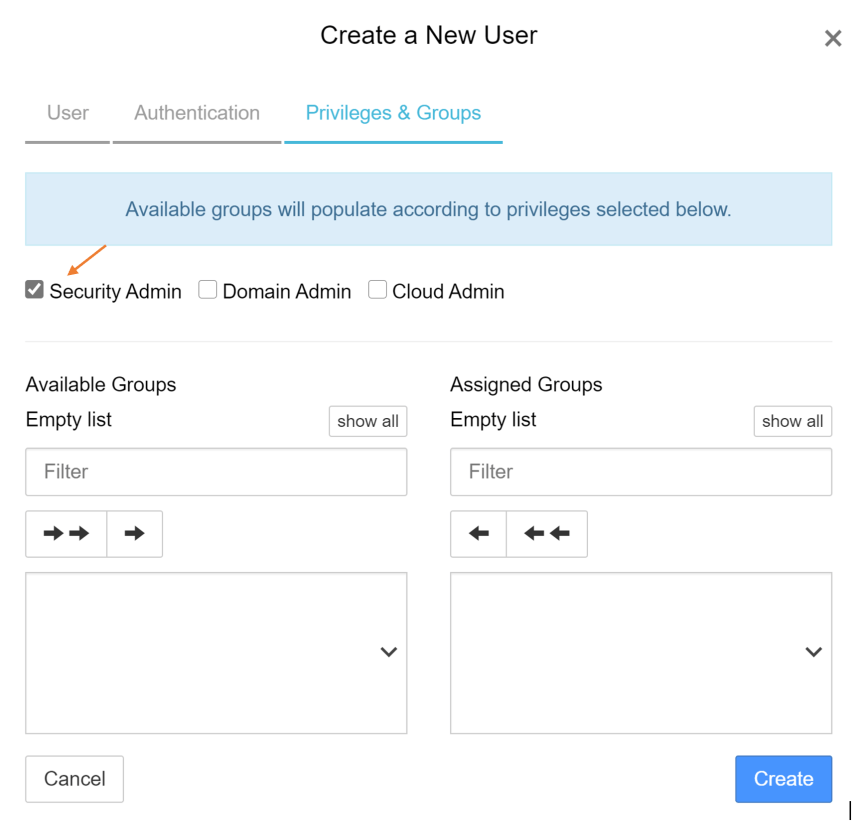
- Select “Security Admin” and Press “Create” to add the new security administrator.
- Login with the new LDAP account
- After the new security administrator has successfully logged into the WebGUI, make the download their admin key.
vSphere Encryption
Now that we have installed and completed a basic configuration of our KeyControl, we can now start configuring vSphere Encryption, vSAN Encryption, and Virtualization Based Security.
Lets Begin!
Privileges!
Before we continue verify the account accomplishing the tasks will have the following privileges in vCenter.
Note: By default, the user with the vCenter Server Administrator role has all privileges.
Requirements for encryption tasks
- Add Cryptographic Operations privileges.
- Global.Diagnostics
- Host.Inventory.Add host to cluster
- Host.Inventory.Add standalone host
- Host.Local operations.Manage user groups
Enabling vSAN encryption
- Host.Inventory.EditCluster
- Cryptographer.ManageEncryptionPolicy
- Cryptographer.ManageKMS
- Cryptographer.ManageKeys
Enable KMIP
Before we can begin, we need to enable and configure KMIP on the KeyControl. Key Management Interoperability Protocol (KMIP) is a protocol designed to allow interoperability between encryption and key management systems. Starting in vSphere 6.5, VMware announced vSphere Encryption and HyTrust was among one of the vendors to start supporting vSphere Encryption.
More info about KMIP can be found here.
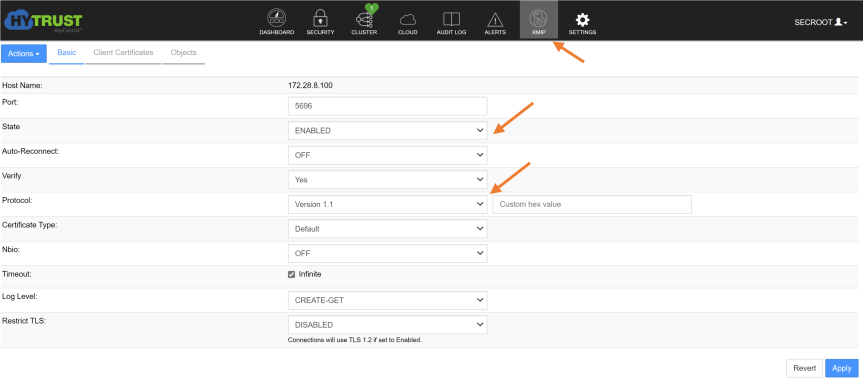
-
Log into KeyControl WebGUI and select KMIP.
-
Configure the following options:
- State = Enabled
- Protocol = Version 1.1
Press “Apply” to finish
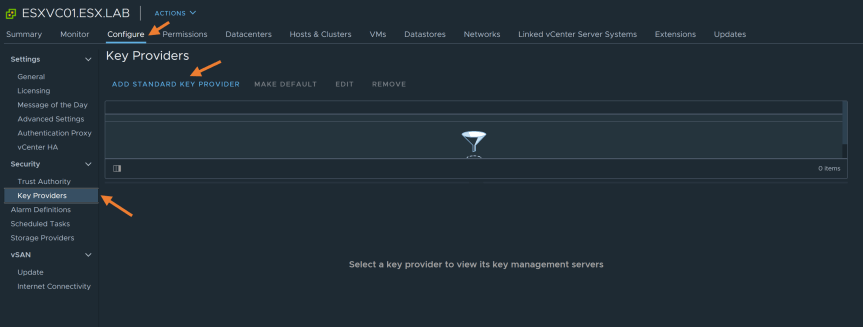
Configure Key Provider
-
Log into vCenter
-
From “Host and Cluster” view, select the vCenter server and select configure.
-
In the configure tab, select “Key Providers” under security section.
-
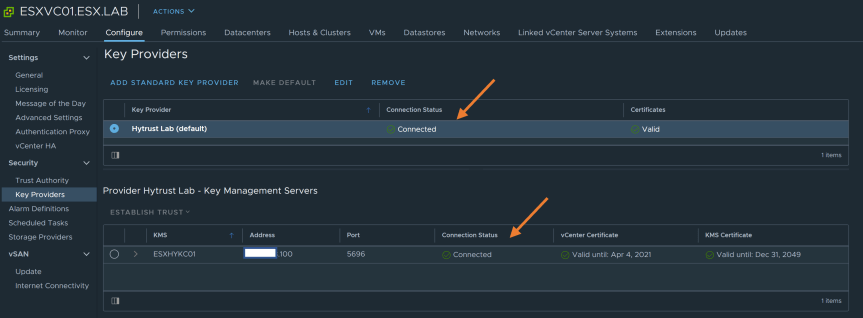
Under the “Key Provider” page click on “Add Standard Key Provider”
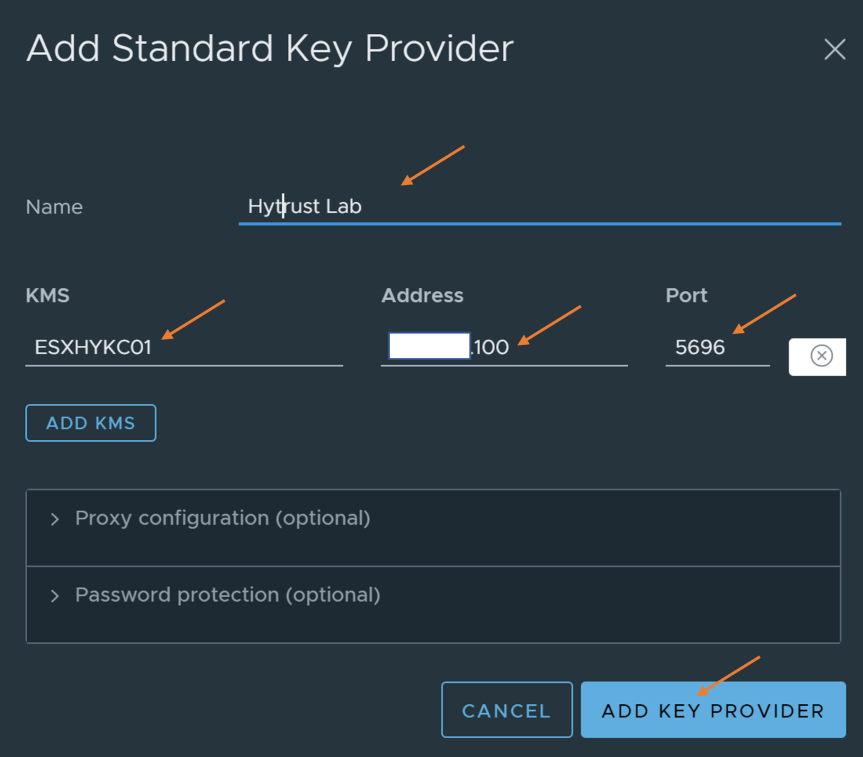
- Add standard key provider
- Name = HyTrust Lab
- KMS
- Name = ESXHYKC01
- Address = IP Address of KeyControl Appliance
- Port = 5696
Click on “Add Key Provider” and “Trust” certificate to finish
-
Now we need to make vCenter and KMS trust each other. Select the Key provider we just added.
-
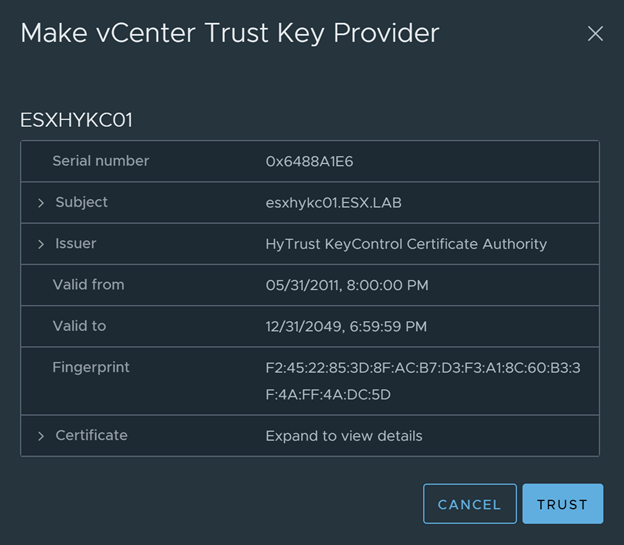
Click on “Establish Trust” and select “Make vCenter Trust KMS”. Accept the Certificate by clicking on “Trust”.
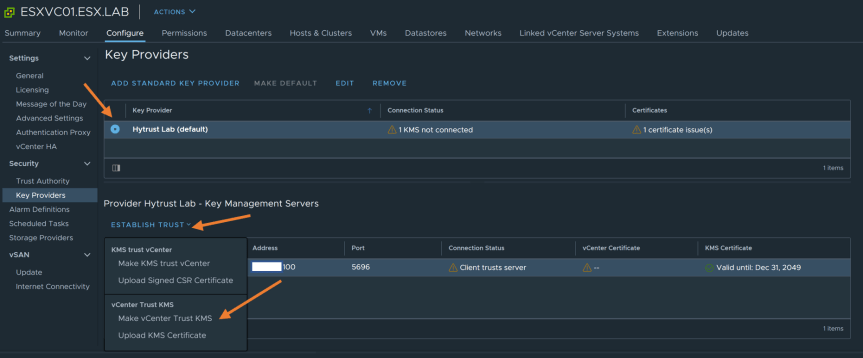
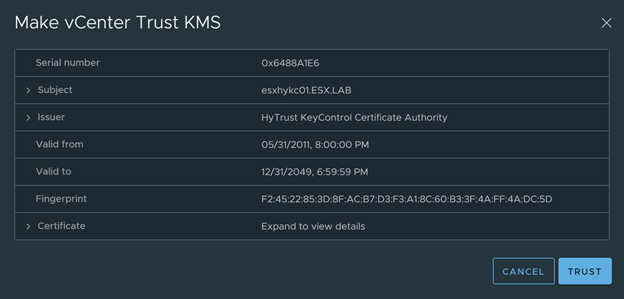
- Click on “Establish Trust” again and select “Make KMS trust vCenter”

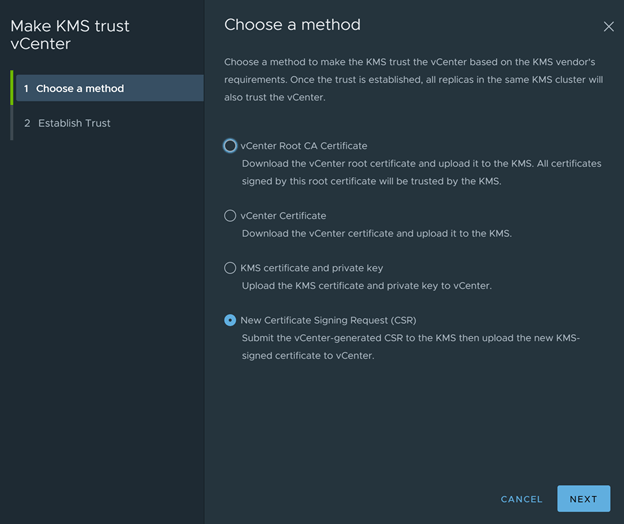
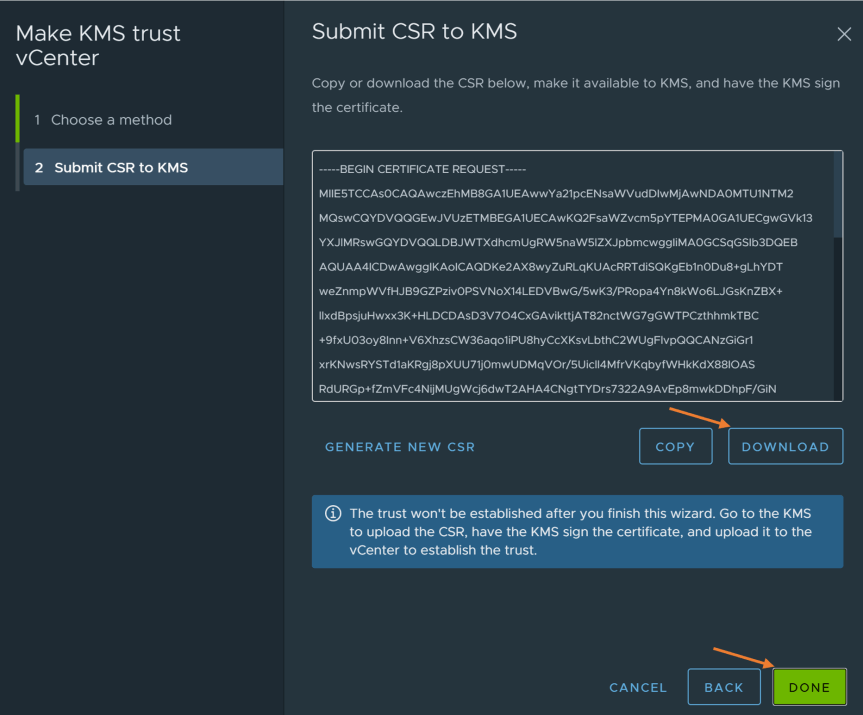
- In the “Make KMS Trust vCenter” wizard, Select “New Certificate Signing Request (CSR)” and Press “Next”.
- Download the CSR and press “Done” to finish
- Log into KeyControl webGUI and go to KMIP tab. Inside the KMIP tab, select “Client Certificates” and use the actions drop down menu to create a new certificate.
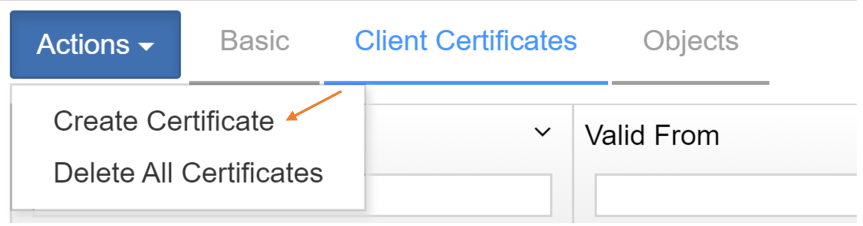
- In the “Create a new Client Certificate” configure the following:
- Certificate Name = KMIPvSphere
- Set Certificate Expiration Date
- Upload CSR that was downloaded from vCenter
- DO NOT CONFIGURE A PASSWORD
Press “Create” to finish

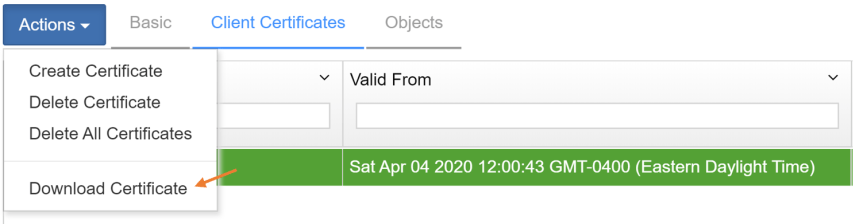
- To select the new certificate we just created, use the actions drop down menu to download the certificate.
Note: A zip will be downloaded. Make sure to extract the zip in order to upload the certificate to vCenter later.
- Go back to the vCenter key provider page and upload the signed CSR certificate we just downloaded from the KeyControl.

- Upload the CSR by selecting “Upload a File” and press “Upload” to finish.
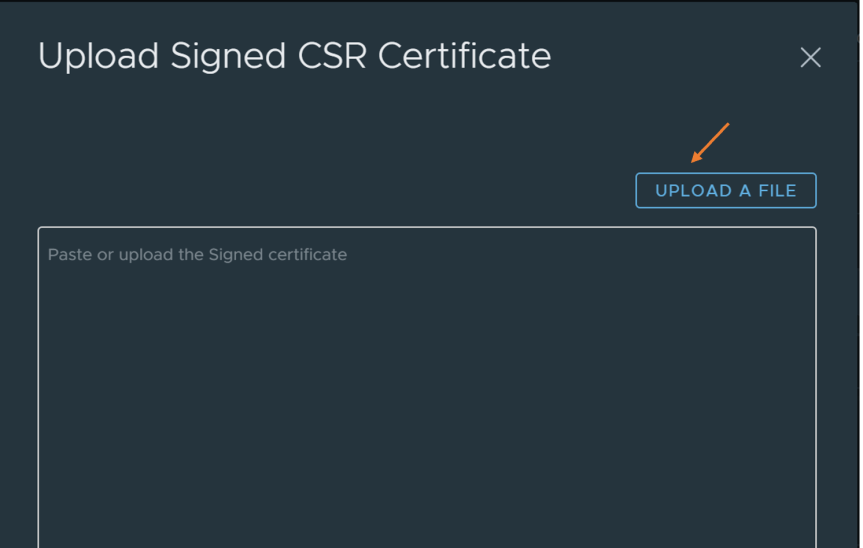

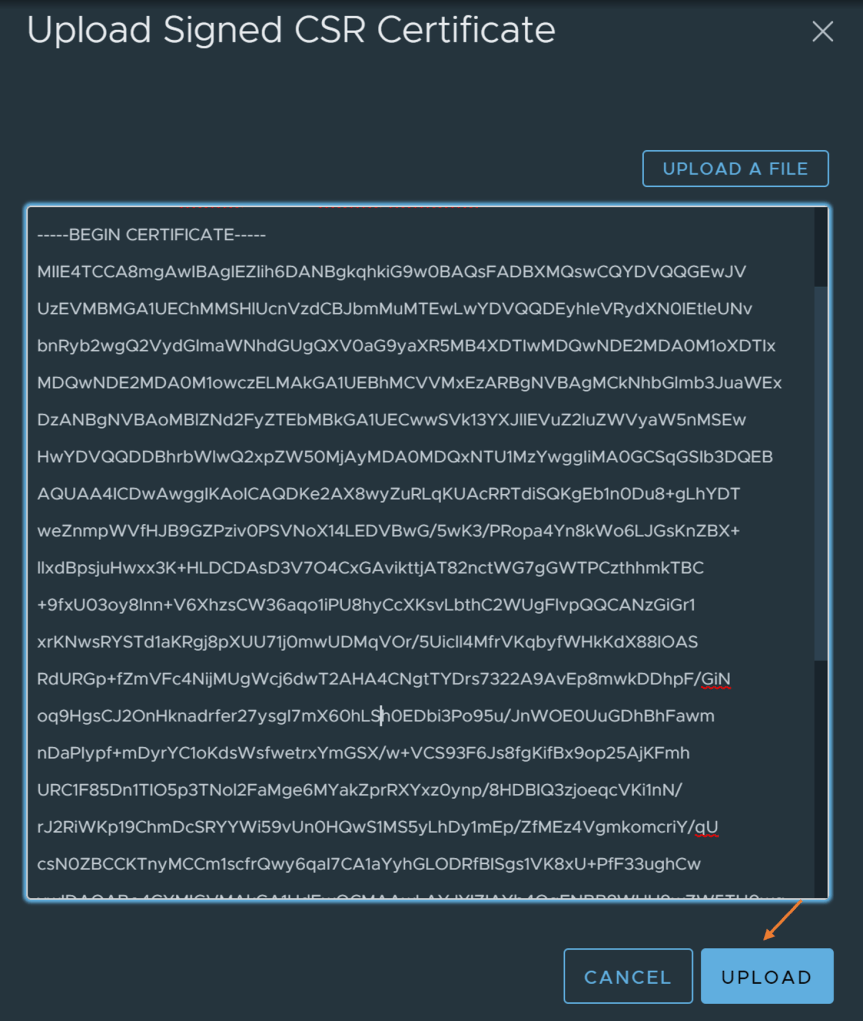
- Once you upload the CSR, vCenter and KMS should now trust each other!
Enable vSAN Encryption
-
Log into vCenter
-
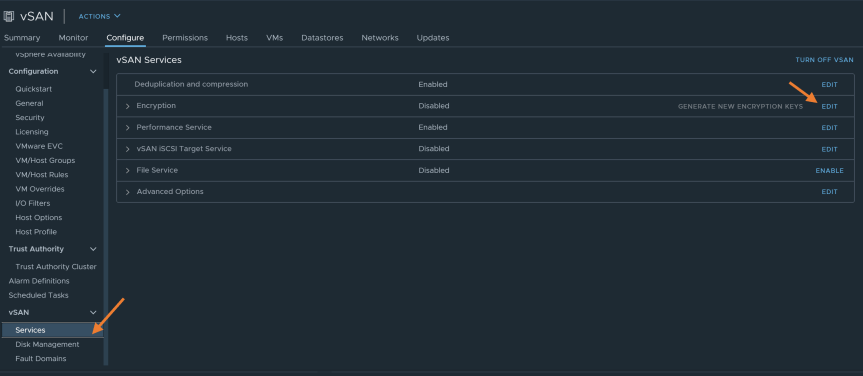
From “Host and Cluster” view, select the vSAN cluster and select configure.
-
In the configure tab, select “Services” under vSAN section.
-
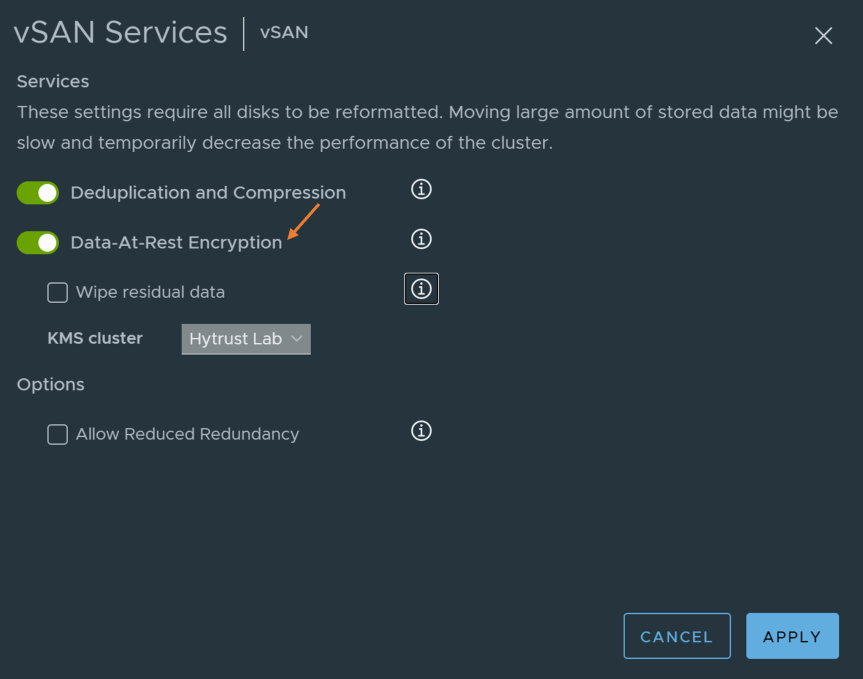
Under the “vSAN Services” page, click on “Edit” on the Encryption option.
- Enable “Data-At-Rest Encryption” and click apply to finish
Note: Be careful with Wipe Residual Data. This will wipe the existing data from the storage devices as they are encrypted.
- In the “Recent Task” view, you will notice vSAN reconfiguring tasks. This may take some time depending on vSAN cluster size.

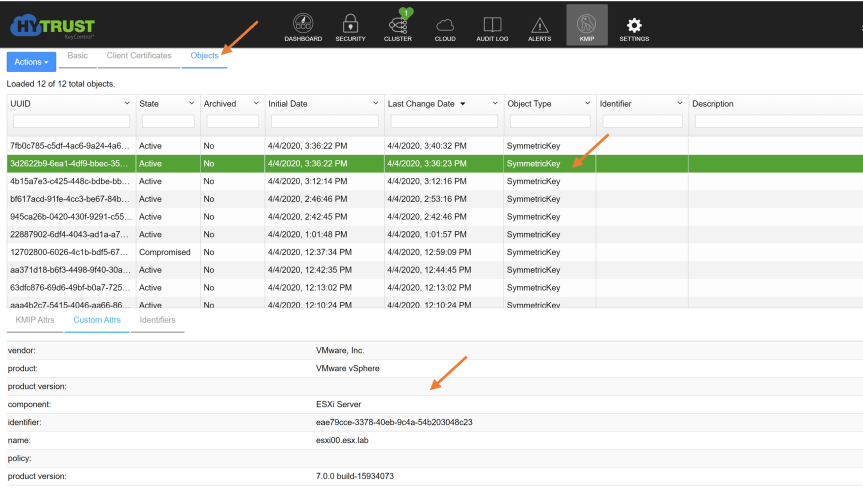
- You can verify keys are being stored in KeyControl by going to KMIP page and selecting “Objects”. On the Object page, you will see the keys that have been generated by vCenter stored in KeyControl.
Note: KeyControl supports 13,000 KMIP objects. After this limit, the KMIP server will still create and maintain the objects but the KeyControl webGUI may not display those objects correctly.
Encrypting a New Virtual Machine
-
Log into vCenter
-
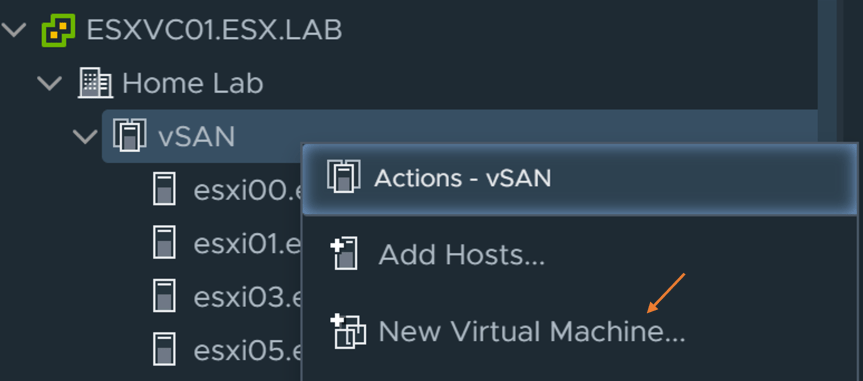
Right-Click on a compute resource and select “New Virtual Machine”
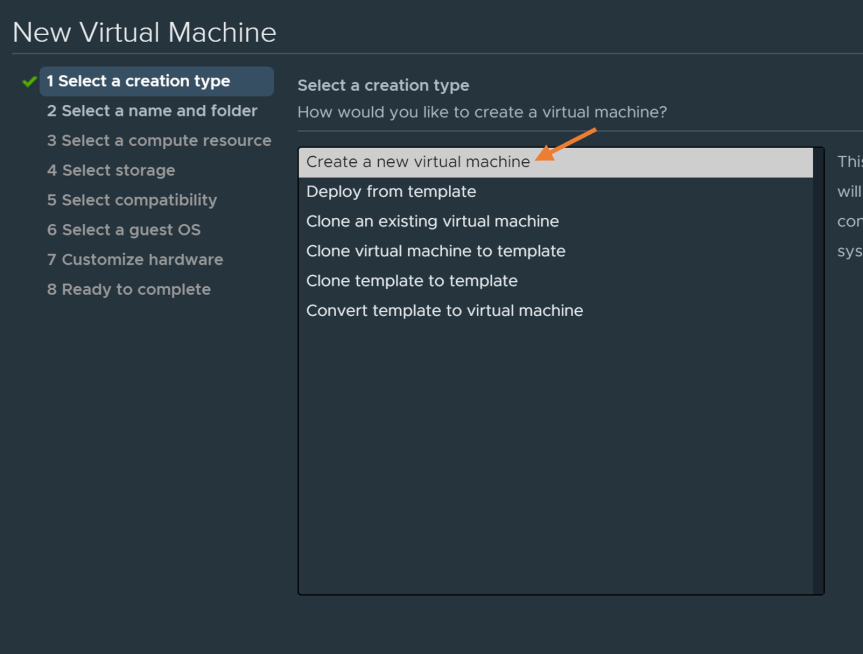
- In the “New Virtual Machine” wizard select “Create a new Virtual Machine”
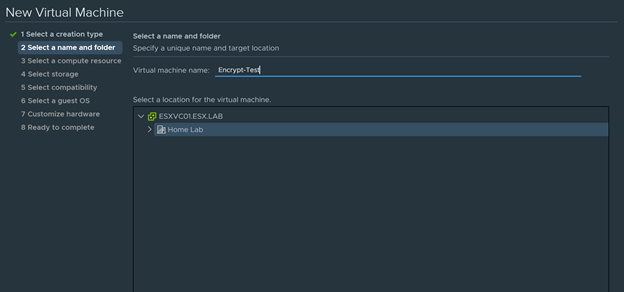
- Next provide a virtual machine name and a folder location for the virtual machine.
In this Demo I will be calling my virtual machine “Encrypt-Test”
-
Select a compute resource for the new virutal machine.
-
Select “Encrypt this virtual machine”. Change the VM storage policy to “VM Encryption Policy”. Select a compatible datastore where the new virtual machine will be deploying to.
You can find more information about storage policy here.
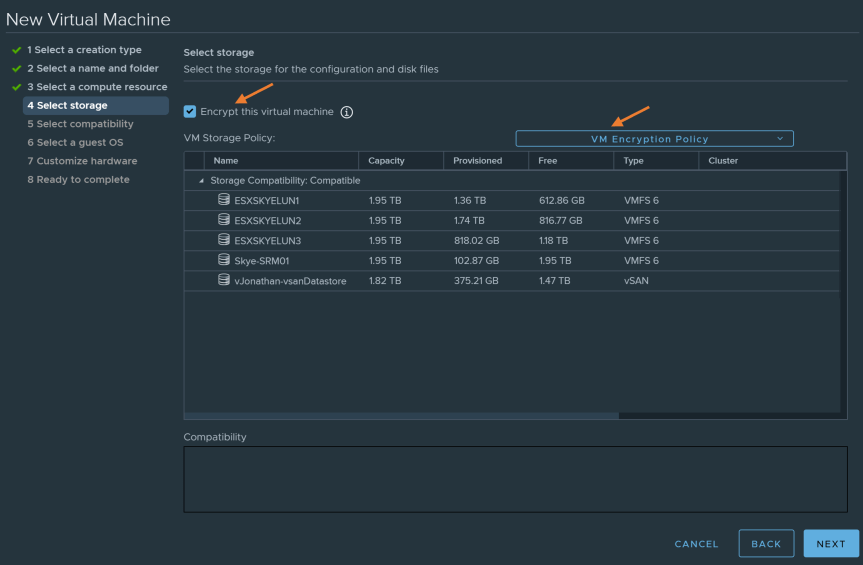
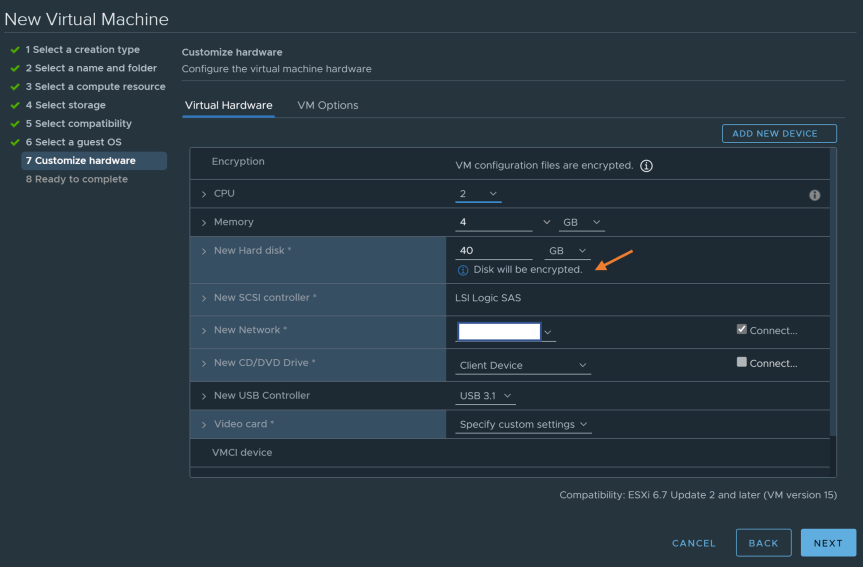
- After selecting the Virtual Machine hardware version and selecting guest OS, you should now see the virtual disk is now set to be encrypted.
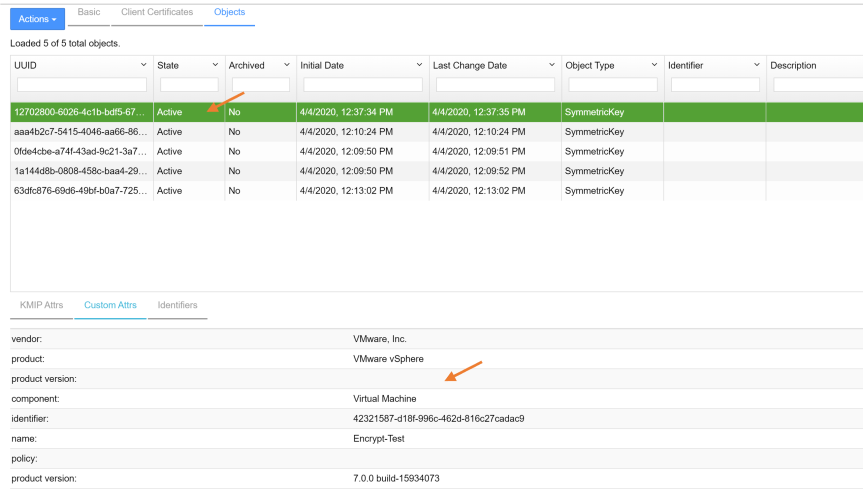
- After the new virtual machine is encrypted, you can check KeyControl to verify the key has been stored in the KeyControl.
You can verify keys are being stored in KeyControl by going to the KMIP page and selecting “Objects”. On the Object page, you will see the keys that have been generated by vCenter stored in KeyControl.
Encrypting Existing Virtual Machine
Before we can encrypt the virtual disks of an existing virtual machine, we must enable encryption on the virtual machine itself. The virtual machine I am choosing for this demo lives on VMFS datastore via iSCSI and not vSAN.
-
Log into vCenter
-
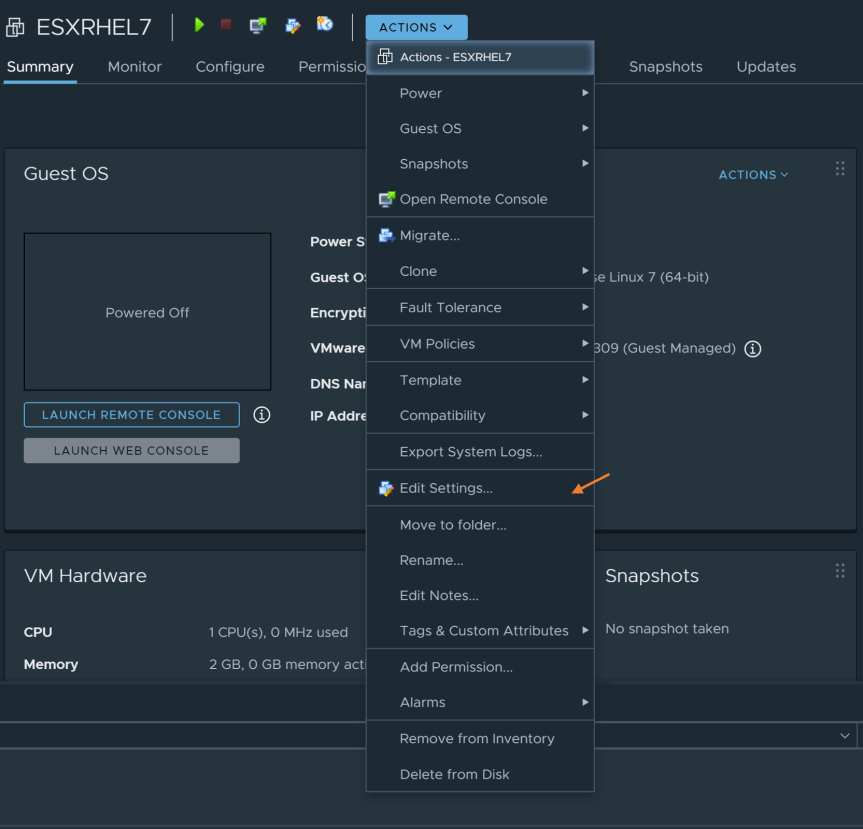
Select existing virtual machine and edit the settings
Note: The virtual machine must be powered off before encrypting the virtual machine.
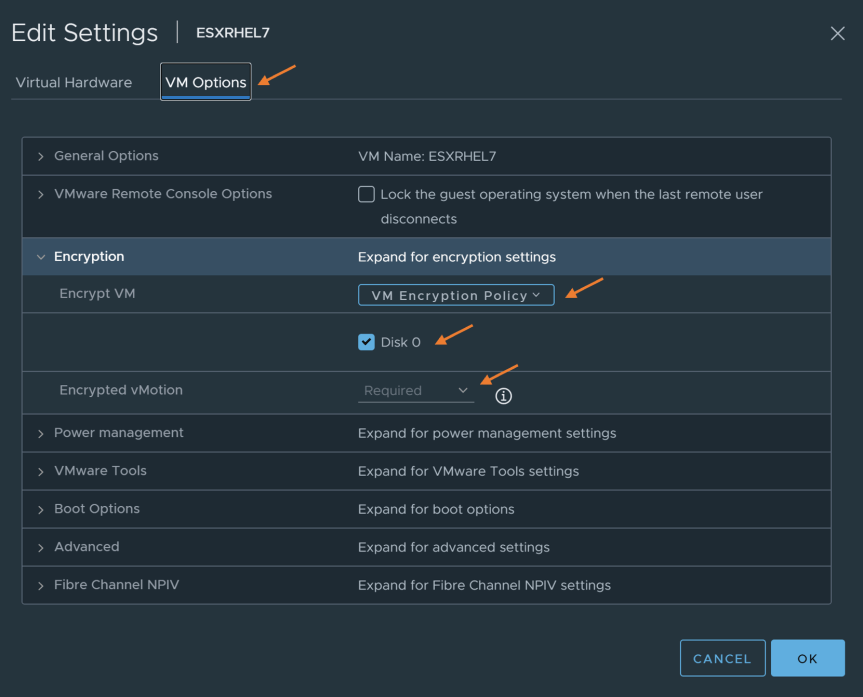
- In “Edit Settings”, go to the VM options tab. Go to the Encryption section and set “Encrypt VM” to “VM Encryption Policy” storage policy. At this point, you should see disk 0 was selected and encrypted vMotion was set to “Required”
Press “OK” to finish
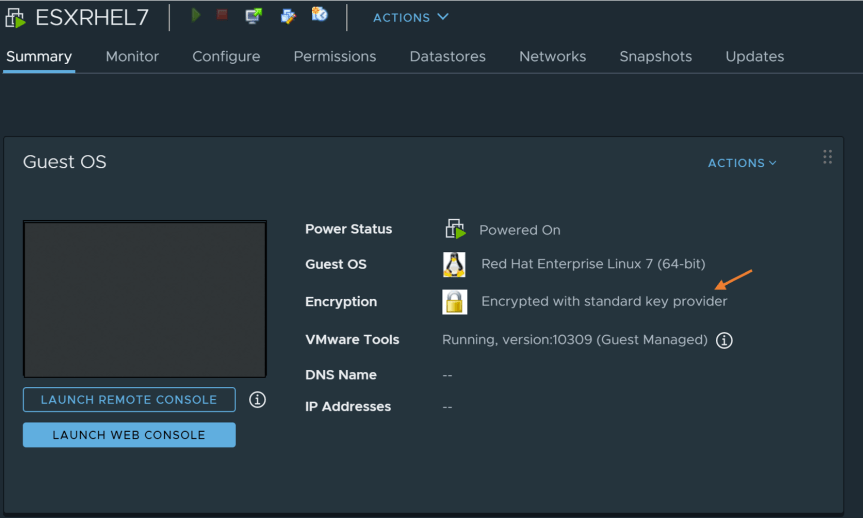
- After enabling encryption, you should now the see the encryption status on virtual summary page state “Encrypted with standard key provider”
- After enabling encryption on existing virtual machine, you can check KeyControl to verify the key has been stored in the KeyControl.
You can verify keys are being stored in KeyControl by going to the KMIP page and selecting “Objects”. On the Object page, you see the keys that have been generated by vCenter stored in KeyControl.
Decrypting Virtual Machine
-
Log into vCenter
-
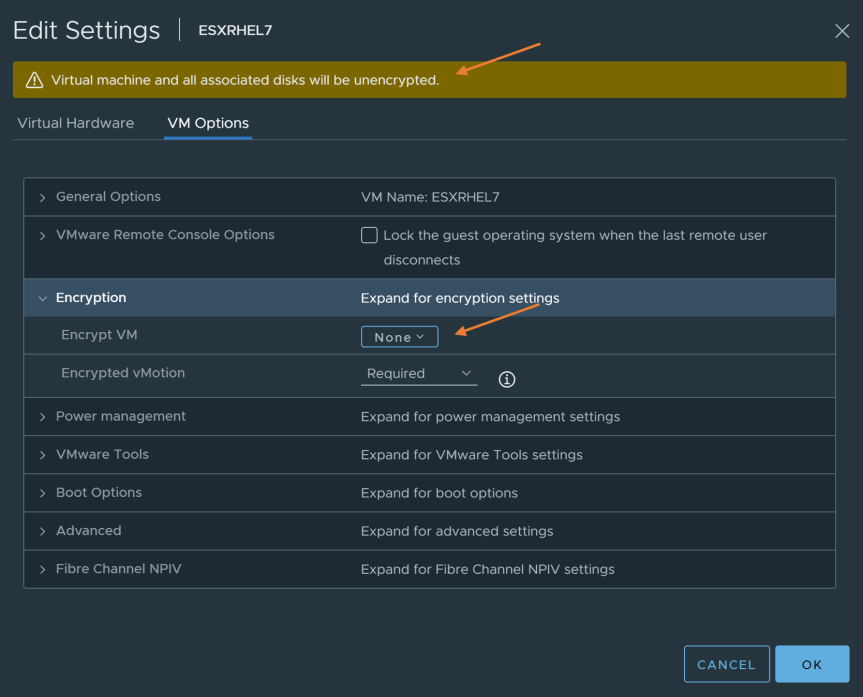
Select existing virtual machine and edit the settings
Note: The virtual machine must be powered off before decrypting the virtual machine.
- In “Edit Settings”, go to the VM options tab. Go to the Encryption section and set “Encrypt VM” to “none”. A warning will appear stating “Virtual Machine and all associated disks will be unencrypted.”
Press “OK” to start the decryption process.
- After decrypting the virtual machine, you should now see the encryption status on virtual summary page state “Not Encrypted”

Revoking an Object in HyTrust
I was curious what would happen if we revoked a key for a virtual machine that was already encrypted. In this demo, we will be revoking a key for a virtual machine.
-
Log into KeyControl webGUI
-
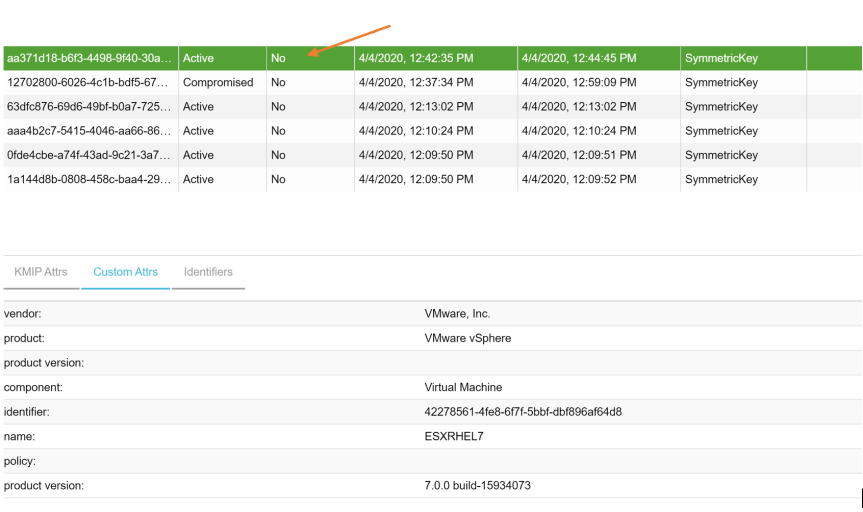
Go to KMIP tab and select objects tab, select a key underneath the objects tab. Once you have selected the key, click on actions and choose “Revoke”.
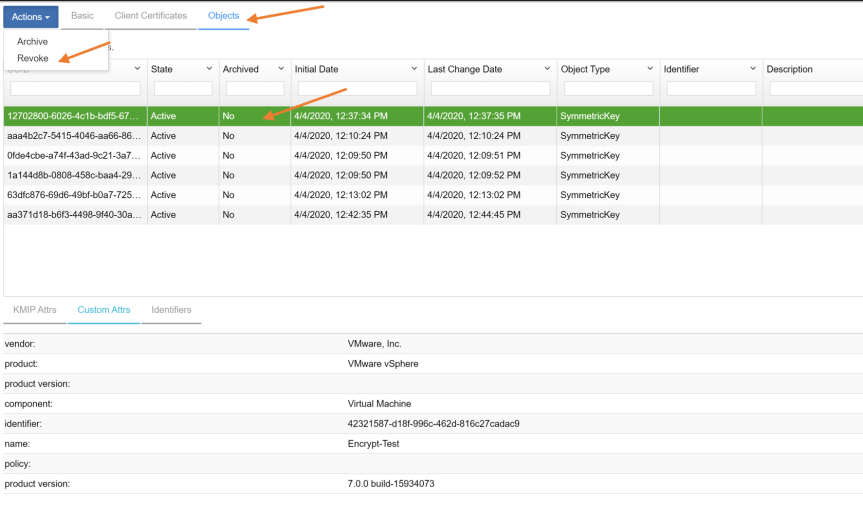
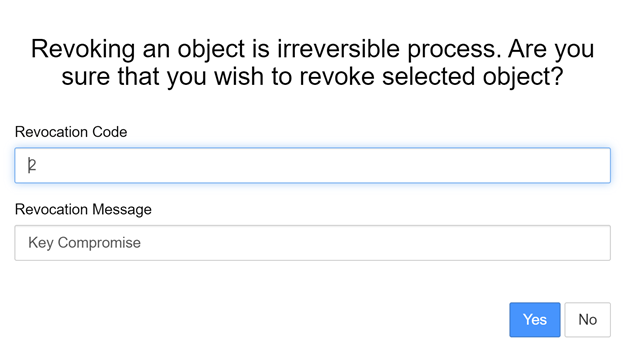
- Dialog box will appear asking you to provide “Revocation Code” and “Revocation Message”. When finished, click “Yes” to revoke the key.
Click here for more information about Revocation code and message.
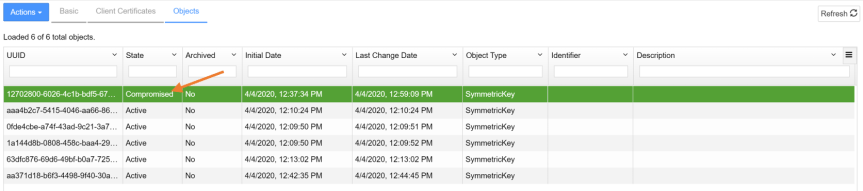
- After revoking the key, under the objects tab, you should see the state is now changed from “active” to “compromised”.
- Now that the key is revoked for “Encrypt-Test” virtual machine. What happens if we powered on the virtual machine now ? You would be greeted with the following error:
A general runtime error occurred. Key 12702800-6026-4c1b-bdf5-6750be61cebd/Hytrust Lab not found.

Can I power it back on ? Yes, we will have to decrypt the virtual machine first before we can power it back on again.
Configuring Virtualization Based Security
Windows 10 and Windows Server 2016/2019 have the ability to use hardware virtualization to isolate critical parts of the operating system. Security features like Windows Defender Device Guard and Credential relies on VBS. Microsoft introduced Windows VBS with build 1709. VMware announced support for enabling VBS within the windows guest OS with vSphere 6.7. In order for Device Guard and Credential Guard to be secure, a TPM 2.0 device must be presented to the guest OS.
There are some requirements necessary in order to add a virtual TPM to a Windows 10 or 2016/2019 VM.
- Be at Virtual Machine Hardware Version 14
- Use EFI firmware
- Have VM Encryption provider configured in vCenter
Wait! I can use Bitlocker to encrypt my Windows guest OS ?
SIMPLE ANSWER: NO!
Now that we can add TPM to VMs to expose to the guest OS doesn’t mean we should be enabling Bitlocker within Windows guest OS. This is not a supported model by Microsoft or VMware! Why would you when you can enable encryption on the VM itself.
Mike Foley wrote a great blog about vSphere 6.7 and VBS which can be found here.
Lets begin!
-
Log into vCenter
-
Select the Virtual Machine ( hardware version 14 or above) you plan on enabling VBS and edit settings.
-
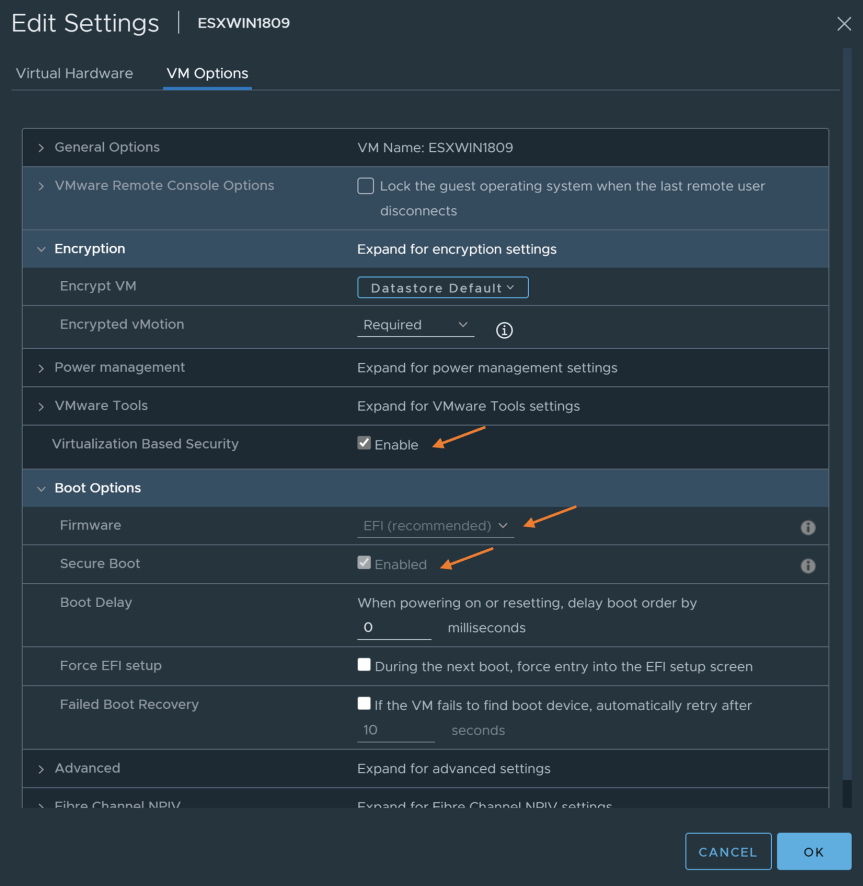
Within edit settings, select the “VM options” tab and verify the following is enabled:
- Virtualization Based Security = Enabled
- Boot Options
- Firmware = EFI
- Secure Boot = Enabled
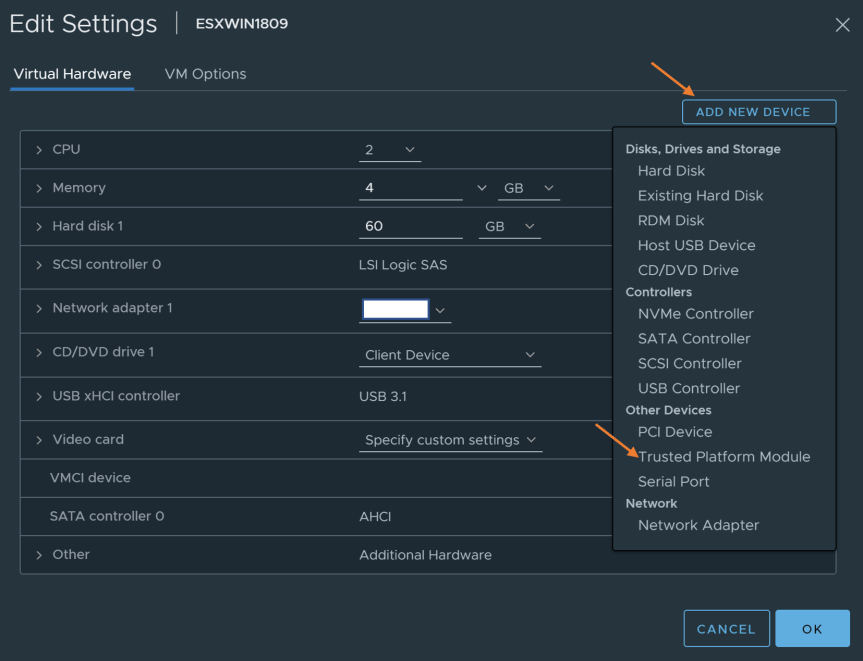
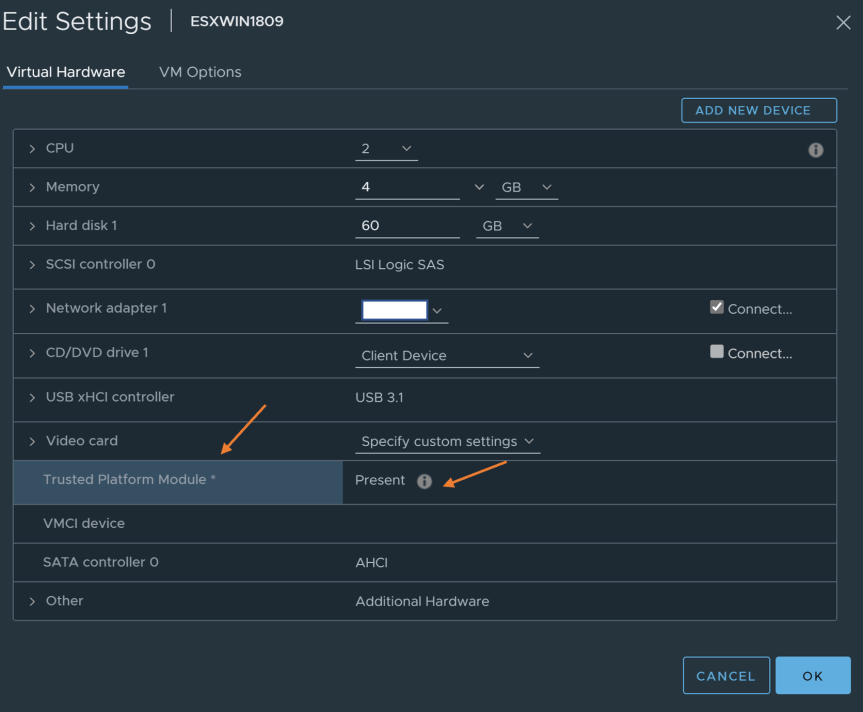
- After enabling the VM options, go to the “Virtual Hardware” tab. Click on “Add New Device” and select “Trusted Platform Module”. Verify the “Trusted Platform Module” was added to the Virtual Machine.
Press “OK” to finish
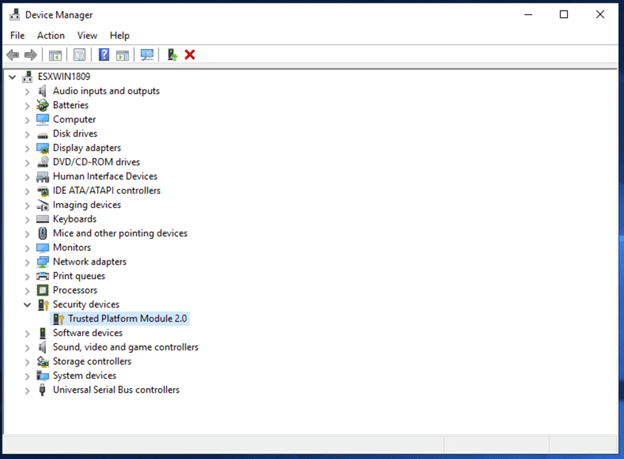
- Power on the virtual machine and log into the guest OS. In windows 10/Windows Server 2016/2019 verify the TPM is available. Check either device manager or run “Get-TPM” via Powershell.

- After verifying the TPM is available, we need to enable Virtualization based security within the guest OS. Microsoft provides a Powershell script that enables device guard and credential guard. These features rely on virtualization based security to be enabled.
For more information about how to enable and best practices for virtualization based security visit here.
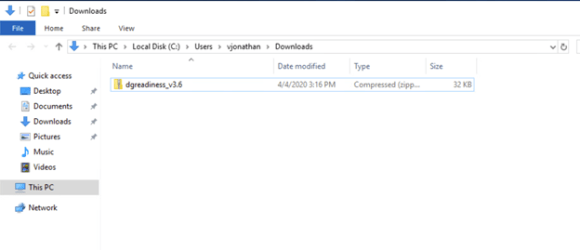
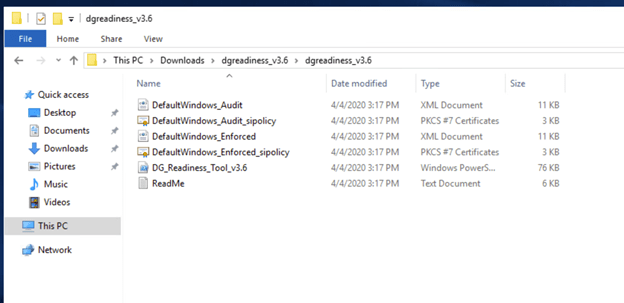
- Within the guest OS, download the “DG readiness tool” from here. After downloading the DG readiness tool, extract the zip so we are able to run the Powershell script.
- Run Powershell as administrator and run the following:
.\DG_Readiness_Tool_v3.6.ps1 -ready
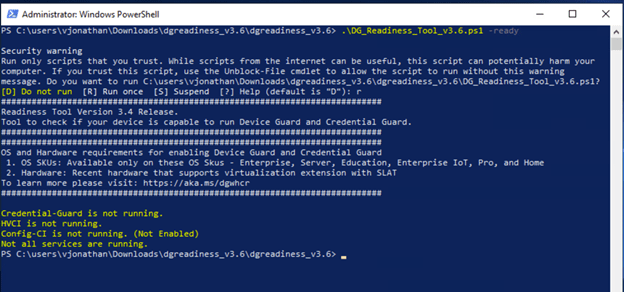
As you can see the “-ready” switch verified that DG/CG have not been enabled yet.
- Run the following to enable DG/CG in the same Powershell window.
.\DG_Readiness_Tool_v3.6.ps1 -Enable
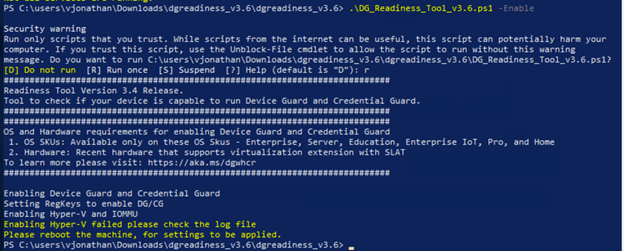
As you can see the “-Enable” switch has enabled and configured DG/CG. We will need to reboot guest OS to finish the configuration.
- After a reboot, run Powershell as administrator and run the following:
.\DG_Readiness_Tool_v3.6.ps1 -Ready
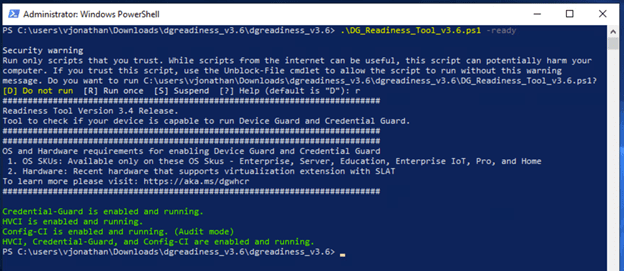
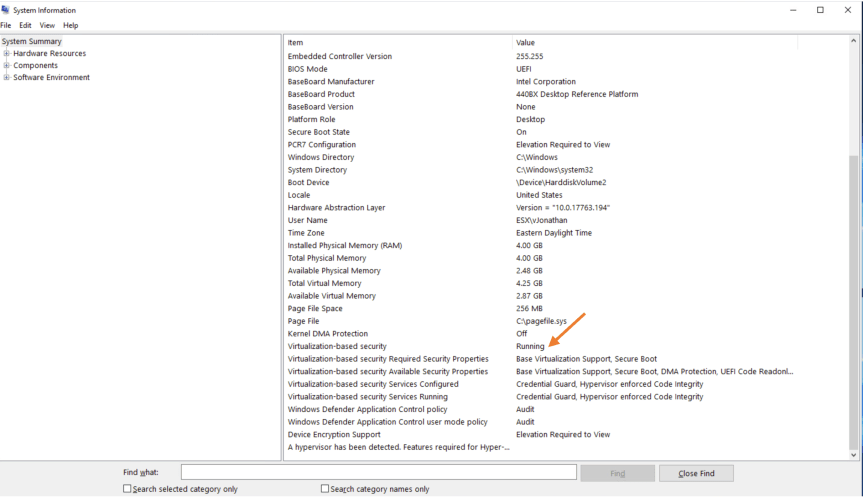
As you can see DG/CG have been enabled and configured.
- Run “msinfo32” to verify VBS is currently running. In msinfo32 under the system summary, verify that “Virtualization-based security” value is showing “Running”.